Digital Stationery for use in Microsoft Word
Follow the instructions below to create Digital Stationery for use in Microsoft Word:
1. Download the attached Word file; the highlighted region is what you can edit
2. Remove highlighting by selecting "Review" in the ribbon/toolbar, clicking the "Restrict Editing" button and unchecking the box in the right toolbar called "Highlight the regions I can edit."
3. Save your edits as a Word document, PDF, etc.
Digital Stationery for use in Outlook
Follow the instructions below or download the PDF to create Digital Stationery (in Outlook):
- Launch Microsoft Outlook and click on New E-mail in the Include Group menu bar.
- Format the message with all of the elements to be included in the stationery (i.e., images, background color, horizontal lines, fonts, etc.)
- In the message window, click the File.
- Click Save As.

- In the Save As address bar, enter %appdata%\microsoft\stationery and press Enter. This will open the Stationery folder.
- Enter a name for the stationery.
- Select HTML from the Save as Type dropdown.
- Click Save.
Applying Stationery to Outlook Messages
Automatically Include Stationery in All Email Messages
- Click on the File tab and select Options.
- Click Mail and select Stationery and Fonts.
- Click Theme from within the Personal Stationery section.
- Select the stationery file and click OK.
- Make the appropriate Font selection and click OK.
Include Stationery in Individual Messages
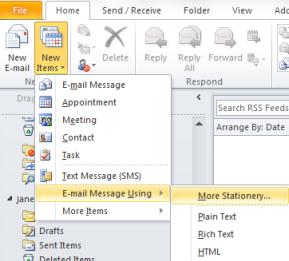
- Click on New Items from within the Home tab and select Email Message Using, then More Stationery.
- Select the theme or stationery to be included and click OK.